


Is It Necessary To Seal Concrete?
- Details
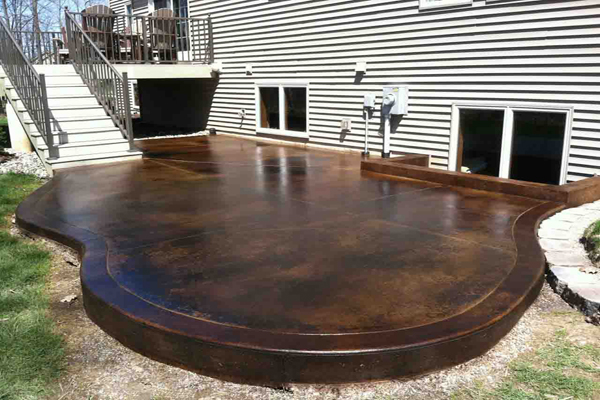
The same can be said for projects involving decorative concrete in the outdoors. Based on seal coating Columbus, colors will fade if not sealed, water marks may appear, and stains may penetrate, leaving unsightly oil spots where
 the service guy parked his ancient jalopy on the driveway. It's simple: without a good sealer, the job would not last.
Is sealing outdoor ornamental concrete jobs worth it to your consumer in a tight economy where every penny counts? Let's look at a few of the problems.
Appearance
Sealing an outdoor decorative concrete project is the best, and as far as we know, the only, technique to prevent color changes caused by UV rays from the sun. In just a few months, an unsealed, ornamental tinted concrete surface will display faded colors. You might tell your customer that's what happens when a project isn't sealed and let them decide whether or not to seal it, but rest assured that a "I told you so" from you when the fading occurs won't make them feel better. Whether you deserve it or not, you will be held responsible for a poor work, and negative feedback will harm your business. It's usually enough to show them a touchable example (rather than just a picture) of the extra depth of color that occurs when ornamental concrete is sealed to persuade them that sealing is the way to go.
Time
We all know that time is money, thus cutting labor costs as much as possible when bidding a task is a strong temptation. Simply removing the sealer, cleaning the concrete, and declaring the job finished is a tempting approach to save money and move on to the next project. It also implies that the customer will be able to utilise their space sooner for their large cookout.
Cost
True, sealing an outside ornamental concrete job will increase the project's cost. Concrete sealer from a reputable brand isn't cheap. When you factor in the expense of prepping the surface and applying the sealer, the price has risen significantly. Your duty is to explain to your customer that they've invested a lot of money in their decorative concrete, and it needs to be protected.
Maintenance
The ease of upkeep is one of the benefits of sealing an outdoor ornamental concrete surface. Dirt and dust readily wash away, and spills wipe away with ease, leaving the surface undisturbed. That concept is popular among customers. The disadvantage of sealing an outdoor ornamental concrete surface is that it necessitates ongoing upkeep. Concrete must be resealed on a regular basis. That concept is unpopular among customers. Resealing just means more business for you, the contractor.
DURABILITY
Concrete is not without foes. Mother Nature slams the ground with rain or snow, then delivers in bitterly cold temperatures. Water can permeate the pores of an unsealed ornamental concrete surface, causing damage from the severe freeze-thaw cycle. Who knew the movers would drag a large crate across the unsealed surface, scratching and scraping it badly? A excellent sealer prevents water penetration and protects the decorative concrete finish from abrasion, which is exactly what your customer wants.
SAFETY There's no doubting that damp or oily sealed concrete can be dangerous. When sealing outdoor pedestrian surfaces that may be subjected to damp, oily, or greasy conditions, a reputable contractor should always employ a slip-resistant compound. On our website, you may get slip-resistance guidelines from OSHA and the American Disabilities Association. Safety is a simple and inexpensive repair for sealed concrete surfaces, therefore missing the addition shouldn't be an option. While unsealed projects are less slippery, they also lack the advantages of sealing that we discussed earlier in this piece.
To summarize, there are benefits and drawbacks to sealing outdoor decorative concrete. Sealing is a good idea.
How Can I Decorate My Small Bathroom?
- Details
Install Appropriate Lighting
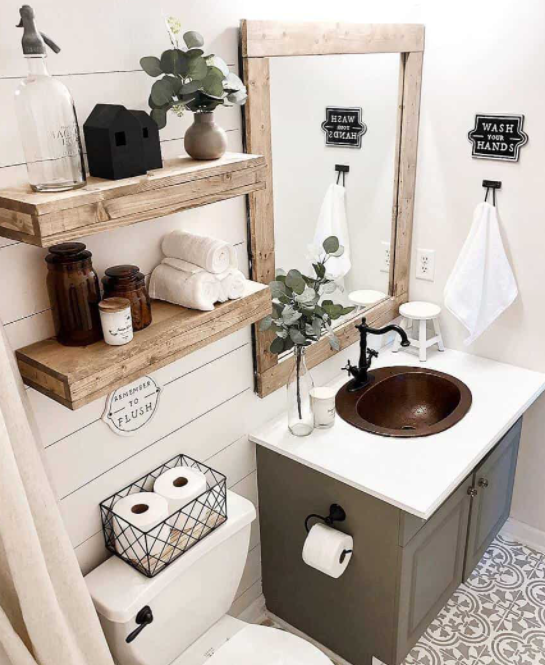 Small places have a tendency to feel claustrophobic, which is exacerbated by insufficient illumination. When picking lighting for your small bathroom, make sure that it is installed in such a way that it illuminates the space enough and evenly. Install your lighting in a way that avoids harsh shadows, and choose a warm white color temperature for the most attractive light that is closest to natural sunlight – 2700K-3000K is typically the closest to daylight.
Light-colored tiles are a good choice.
What better way to make your small bathroom appear more spacious than with light-colored tiles? Light-colored tiles and an overall light color scheme are excellent ways to make a small bathroom feel much larger. When matched with the proper hue and brightness of lighting, you'd almost forget you're in a tiny small bathroom.
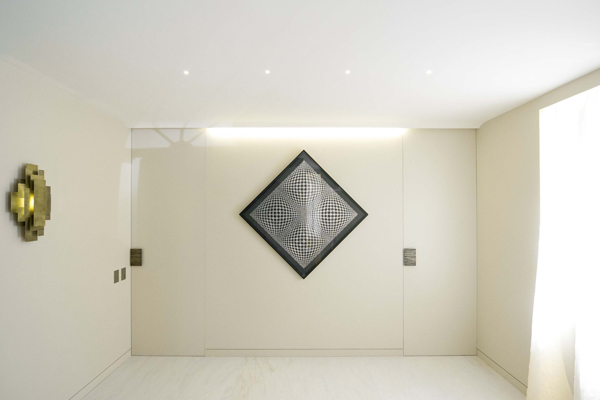
Add a Large Mirror
Mirrors are a simple and straightforward method to add perspective and depth, especially to small rooms, and are one of the oldest tactics in the interior design repertoire. Mirrors are, of course, an intrinsic and useful feature in bathrooms, but that doesn't mean they can't be employed as a decorative feature as well. It may sound contradictory, but when selecting a mirror for a little bathroom, go for the largest mirror available. A larger mirror will give your small bathroom a sense of depth and make it appear larger.
Make The Most Of Vertical Space
One of the most common issues with small bathrooms is a lack of storage space, rather than a lack of freedom to move around. When it comes to mixing décor and storage in a small bathroom, you'll have to get a little inventive. Because your small bathroom has limited floor space and built-in cabinet space, you'll need to make the most of the vertical space available. This applies to both storage and design: maximize vertical storage with shelves or ladders, and use any remaining wall space for decoration by hanging tiny, simple art prints or images.
Install Floating Shelves
Floating shelves are a terrific alternative for bathroom nooks and walls alike, and they're always a good concept for small bathroom decor. They're a terrific method to increase storage space while also serving as a showcase area for ornamental objects like small trinkets or indoor plants. Install them somewhere where they can be beneficial while remaining out of the way - nothing destroys a morning like hitting your head on the corner of a shelf while getting ready for the day.
Choose Glass Shower Doors
When it comes to small spaces in general, and small bathrooms in particular, a good rule of thumb is to keep the area as open as possible. One of the most common mistakes people make when decorating a small bathroom is opting for a curtain rather than a transparent glass shower door. Glass shower doors are more expensive, but they are well worth the investment because they will not only last considerably longer, but they will also provide an uninterrupted line of sight across your little bathroom. Unlike shower curtains, which divide the area and restrict light, clear glass shower doors allow the eye to see the entire room without breaking the line of sight, giving your small bathroom a more airy and expansive sense.
Use Baskets For Storage
Storage baskets are a beautiful, adaptable, and unbeatably cost-effective method to neatly store all of your small bathroom necessities. Baskets are durable and inexpensive, and they're especially simple to match into a nice set, even if you don't have a matching set. Use storage baskets to hold everything from hair brushes under the sink to extra rolls of toilet paper on a floating shelf above the toilet in the bathroom.
How to Clean Aquarium Glass Easier
- Details
 We get the opportunity to talk about a portion of the strategies you could use for managing soil on the aquarium glass.
 Cleaning on the Outside
In the event that you are going to adequately make your fish tank glass look stunning, at that point you need to clean both inside and outside.
Cleaning outwardly is a lot more straightforward than within. You would not need to stress over the cleaning arrangement influencing the fish.
Here is the way you clean outwardly of your fish tank glass.
Utilizing warm water, continue to wet delicate material or some paper towels.
With your wet fabric, wipe outwardly of the aquarium glass to expel the soil development on the glass. In the event that the earth is difficult, utilize a tad of cleanser to guarantee that it conveys the best cleaning impact.
You would now be able to wash the glass with a clean delicate material to expel the abundance cleanser on the glass all things considered. Leaving any buildup of the cleanser will simply wind up pulling in more residue and soil sooner rather than later.
As should be obvious, cleaning outwardly can be basic, it ought to likewise be basic too when hoping to clean within sheet.
Utilizing a Simple Sponge Method
You would be astonished to realize that cleaning your aquarium glass will require straightforward apparatuses you have in the house as of now.
You need to purchase a froth kitchen wipe. The wipe ought not have any scouring cleaner added to it. The cleaner may wind up scratching the glass in the event that it is available together with the wipe.
Here is the manner by which you clean the glass with a wipe.
Evacuate your fish tank spread to increase better access to within glass sheet.
The cleaning should do delicately. Supplement your hand tenderly into the aquarium and reach for the glass. Continue to slide the wipe here and there to clean the green growth and other earth that may have collected on the sides.
You ought to maintain a strategic distance from any quick cleaning developments or else you would wind up spilling the water over the top causing the cleaning to be chaotic.
Since you have cleaned the tank, the wipe can't be reused sometime in the not too distant future to clean the aquarium window once more.
Utilizing an Algae Scraper Tool
With the headway in different fields, at that point you can hope to discover numerous methods for cleaning your fish tank glass. For this part, we get the opportunity to take a gander at how you can utilize a green growth scrubber instrument to clean the sheet leaving everything clean.
The main thing you need to do is locate the best green growth scrubber for your aquarium. Two or three such devices exist today, so set aside the effort to look at a few models before deciding on one.
Whichever strategy you choose to pick, it is anything but difficult to see that they are on the whole simple to utilize. You need to ensure that you adhere to the offered guidelines to ensure that you don't wind up scratching the glass.
Garden Landscaping Ideas
- Details
Rather than a costly, labor-intensive formal course, save Cash and time with those casual garden paths. They will mix in better and will seem like they have been on your backyard forever.
Required Tools with this Job
Have the required tools with this DIY job lined up Before beginning--you will save yourself time and frustration.
You will also Require a garden trowel and gloves, and a dolly for thick flagstones Along with a tamper.
Informal Paths
This winding gravel trail reflects the informality and simplicity Of upkeep of the backyard. Mulch and gravel would be the cheapest route materials you'll be able to purchase, plus they make building easy also. All you've got to do is eliminate the sod, roll out landscape cloth and spread the dirt or mulch.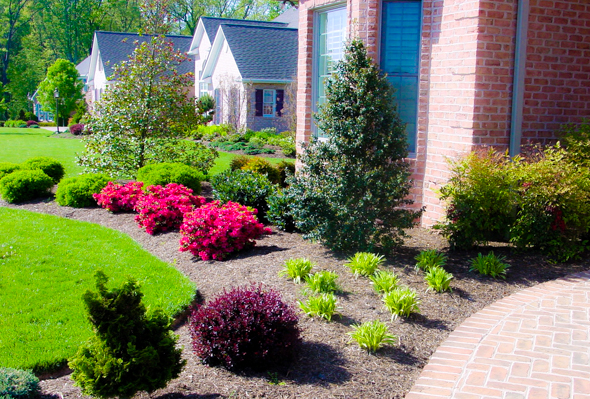
Mulch and dirt paths could be dispersed, wood processor--coated trails or Carefully planned layouts, and they vary from casual to formal based on the plan and trimming material. You may select from a vast array of loose materials such as rough bark, decorative mulch, washed rocks and crushed gravel or cubes.
Mulch
Three common Kinds of compost Acceptable for garden paths are Wood chips, cocoa bean along with cypress bark. Mulch can also be a bit less costly than stone or gravel pebbles. Bear in mind, however, that organic avenues decompose over the years, which means you are going to need to rejuvenate them each two to five years using fresh material. In addition, don't use wood, bark chips or compost for avenues that run through areas with inadequate drainage or which are wet. It is going to result in some soggy path.
You'll find bags of compost at home centres, however for the best Collection of Organic substances for a course, check the regional nursery or landscape provider. Based on how large your course is, it might be more economical to have bulk substance delivered than to purchase luggage. -heavy layer of compost around 3 ft. wide instead to grass. Telephone the public works department in your town hall or see local tree trimming services.
Gravel
Several sorts of inexpensive gravel are all offered for avenues. Typical kinds include: crushed gravel, crushed cherry and pea stone. These substances continue forever and just require occasional weeding to look their very best. If you would like to conduct a wheelbarrow or lawn mower across the road, select crushed stone instead of smooth pebbles.
Gravel for avenues is sold by size and type. Larger rocks, averaging under 1/2 in., are perfect for avenues since they provide more comfort underfoot and package together better. Stop by your neighborhood nursery or Mulch Columbus, Ohio experts to understand what's offered in your town. Gravel is generally sold by the lot. Assess the width and length of this path. Take these measurements to the provider and request help to work out the number of gravel you want. Unless your course is quite brief, it normally makes sense to get the content sent. Gravel to get a route 3 in.
Gravel paths have a few limits, however. The stones could get monitored To the home, and thus don't rely on them close to entrances. And dirt paths are a lousy option in locations where you need to shovel them off. The gravel may wind up on your yard or flower beds.
Use a spacer pole cut into the width of the garden route as a guide once you place the edging or edge. You won't need to keep pulling the tape measure to guarantee that the edges operate parallel. Do not use vinyl. It is going to catch water and generate a fresh path.
If you would like a route that is firm enough to roll up a wheelbarrow on, then use crushed stone and tamp it afterwards leveling it. (Pea stone or alternative curved stone will not compact.)
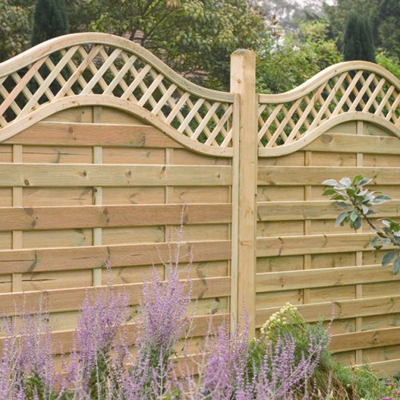
Gravel or compost paths need pruning to maintain the substance A border for a design component. Here are some common Kinds of trimming you can utilize:
Vinyl Landscape trimming is cheap. And it is quick and simple to install. Should you Thing into the expression of the curved top border, conceal it with a boundary of plants. Aluminum edging forms a sharp border that provides the route a fantastic look. It costs over vinyl, though, and can be not as forgiving on sloped terrain.
Brick And rock boundaries are versatile and attractive, but they are more expensive And also much more work to set up.
Concrete Edging is less costly than stone or brick but has the very same benefits. Newer types that seem like arbitrary pieces of tumbled gems are an excellent Lower-cost alternate to a true rock boundary.
Landscape Timbers are an economical option to brick or stone boundaries. They are Particularly helpful for building shallow measures on slowly sloping terrain.
Water damage restoration for your house
- Details
Waking up to a basement filled with Water, a burst pipe on your kitchen or an overflow of water on your bathroom can ruin your whole day. Before you phone a water damage restoration professional, here are a few actions to consider to reduce the total amount of water damage for your house and possessions.
Find out where the water is coming from. This may seem obvious, but if you've just come home and discovered that a gigantic mess and do not know where it originated, the first thing you have to do is to FIND IT. If you are not able to discover the true source of the water, you may have a pipe that has burst. You would like to stop additional water from penetrating your home when possible. If you've got a bust pipe, then turn off the water supply to your house, if your roof is leaking, halt the flow as best possible.
Learn how much harm was done. Some things could be repaired on your own, but when it involves damage to your gutters, floors, or ceilings, then it's ideal to call in a professional.
If it is something you're able to handle by yourself, then first things first: flow!! Open the windows, turn on the fans, let the room breathe! This won't only help out dry, but it will also help reduce the smell. Get out a spoonful and running -- it takes the moisture out of the atmosphere and surrounding items, and helps prevent mold and mildew from growing -- a great tool to have at hand.
Professional water damage restoration services
Water damage cleveland, oh is a Great resource for water damage and flooding cleanup Services in your area. Just visit the website, choose your state from The menu and then click on the featured service provider closest to your property. These highly trained technicians are ready to handle emergencies Around-the-clock, or schedule appointment times at your own convenience!
How to improve your house with the help of cleaning
- Details
Remove the bedding and refresh your bed mattress by combining 5 tablespoons of baking powder with 5 drops of lavender essential oil and sifting the combination over the mattress. Keep for one hour then vacuum cleaner up once you have done everything else.
Windows
Supply the windows a clean down with the window-cleaning fluid and the microfibre fabric. No window cleaner? See how to clean your home windows with vinegar.
Sofas and carpets
Use the vacuum cleaner to pick up all of the dust and dust buried in the sofa's crevices. Scrapes on your own leather sofa? Dab a cloth in a few petroleum jelly and rub the scratch out gently. For a material settee, sprinkle a generous dusting of bicarbonate of soda and vacuum cleaner it up after quarter-hour. You may also sprinkle bicarbonate of soda on the carpet to refresh the help and material remove stains; just leave to sit down and vacuum cleaner up before your visitors arrive.
Kitchen
Go back in to the kitchen area to wipe aside the antibacterial spray in the fridge and wash the fridge shelves which have been soaking. Return all of the shelves and meals to the fridge and change the fridge back again on. Wipe the oven clear with a brand new sponge. Kitchen area cupboard staples like tin foil are excellent for eliminating stubborn grit on the oven shelves - just scrunch it up right into a ball and scrub aside the dirt.
Final steps
You’re nearly done! Return back through the areas and vacuum cleaner up the scattered baking soda from the carpets and rugs, vacuum make the mattress with fresh linen after that, rehang the curtains and nets and near the windows. Right now sit down and read more interesting cleaning tips suggested by home cleaning services worcester ma!
The way to select the ideal paving guide
- Details
This Simple DIY manual to presenting is Designed to Supply People that need To-do paving but have no idea how to get started with several recommendations and guidelines from paving company columbus ohio.
It's also likely to offer guidance on how you can incorporate paving into a Residence Employing inexpensive paving cubes you could grab in the regional Builders Warehouse and construction supply store which are not precisely the ideal paving bricks it is possible to purchase, but they're cheap and will be completed to put in curb appeal to your house or install a backyard place. Pop in to a community building supply retailer and you're able to grab paving bricks which cost in the order of r 2.00 each, insert in the expense of rough and mud at approximately R80 percent metre and you'll understand that paving isn't that costly if you dwelling.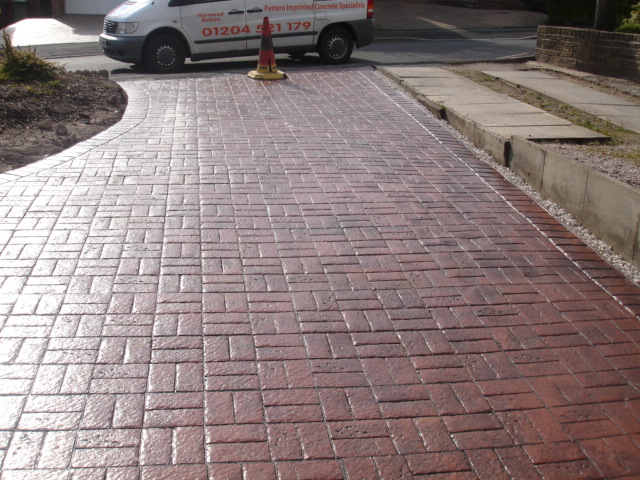
Paving bricks
River sand
Okay sand
Cement
Quantify up the Region until you Begin to calculate just how many paver Bricks you'll require, and also just how much sand has to be delivered.
The location to be paved should be emptied outside. That can be a significant measure and There are many factors you want to take under account when preparing the region.
- Inside my instance the amount required to be less in relation to the usual sitting gate, to permit for closing and opening, and also you may even have to consider this under account if you're paving a place which has access and exit points.
- The paving Has to Be at a very small angle should butting Facing an Existing property wall. As my brand new ecosystem butts up against the leading part of the home, the paving is tilted at a small incline away from the land, in order that any rain will probably run off and perhaps not amass against the land walls. If you're paving an outdoor terrace or entertainment area beyond your home, be certain that rainwater flows out from the construction to a acceptable point - rather a drain or perhaps a reduce point that'll direct rain using the pure flow of this property.
- The place has been paved Should be Free from lumps and bumps, as these can Affect the degree of these pavers once placed. After digging out the region and removing loose dirt, use a rake to eliminate any loose stones.
Compact the soil until you place down sand, particularly when you needed to perform A serious little digging to find the degree right. You are able to seek the services of a plate compactor to your afternoon by a grocery store shop, also this will guarantee that the earth is compacted securely. If you really don't compact the dirt precisely you may possibly discover that you'll have a issue with dips at which the paving sinks to tender stains throughout the rainy season. Compact the earth once or twice to be certain it's done precisely.
Lay rough sand across the compacted location. If you are not sure what sand to Purchase For the foundation, allow the inventors at the construction center know which you're deploying it to paving base plus so they are going to be certain to receive the perfect sand. Coarse sand is nice sand which does not clump or hold together whenever you streamlined on your own hand.
With the floor already flat you can shovel little piles of sand over the Top with the. Make use of a straight edge (a part of steel or span of directly hardwood) to even the sand out. The sand base has to be approximately 4 to 5 centimetres in depth.
Today you're all set to get started placing the stairs. It is not always possible to Put the paving bricks directly up against a wall socket, specially where walls aren't Right, therefore make a tiny gap at the border. You can always fill big openings with Cut pavers or mix up a heap of cement to fill out those are as after you own Finished.
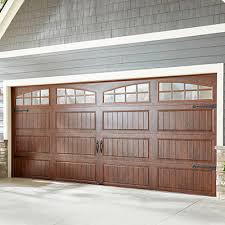
Installing a New Kitchen Cabinet
- Details
When installing new cabinets, you plan to do the job after the completion of the Rough wiring and plumbing but before the end floor has been installed. By installing the floors following cupboard installation, you won't utilize more floors than necessary and the new floors won't run the danger of building damage.
If you are replacing obsolete cabinets, then remove the old cabinets attentively so You don't damage the walls and so you can use them for taking crucial dimensions (or, in some instances, as patterns to the brand new cabinets). The ideal way for removal is to take off all of the doors, pull out the drawers, and lift out any detachable shelves.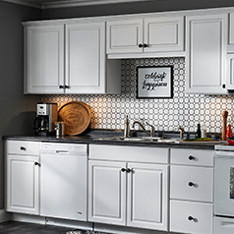
Most cabinets are fastened to wall framing members through their backs with Screws or nails, which you will need to pull. Be sure to have a helper when you eliminate upper cabinets-as you extract the fasteners, you are going to need help holding the cabinets up. If cupboards are screwed together by using their negative panels, also remove these screws so you can eliminate the cabinets one by one.
The walls which back new cabinets need to be flat, smooth, and clean. To Assess them for flatness, put a long straightedge against them. Mark any lumps or voids so that, during installation, you can correct for them.
Unpack your cabinets and make sure all the elements are included. Wait till after cupboard installation to include doors, drawers, and shelves. Should you remove any parts, make certain to tag them so you can return them for their proper places.
The primary wall and base cabinets are all key-if you get them installed flat From rear to front and side to side, the other cabinets should follow suit. It's easiest to start with the wall- mounted cupboards so that the base cabinets won't obstruct your job.
Installing Wall Cabinets
When installing kitchen cabinets Arlington Heights, IL, it is easiest to install the upper wall Cabinets first; this way, the base cabinets are not in your way during the essential lifting and fastening.
Heavy--just imagine their weight when they are loaded with dinnerware or foodstuffs. The wall cabinets have to be installed with the correct sort of screw. It's crucial to fix cabinets securely into the wall stud framing supporting the wall's surface stuff.
Some screws Need separate end washers, and some do not. Do not use drywall screws--they are not strong enough. The screws you utilize Must go through a solid part of the cabinet, like a support rail that runs Along the cupboard back. Every cupboard Ought to Be secured by at least three inches.
Bbq grills recommendations
- Details
These expert recommendations may have you shooting on the bbq grills Columbus, Ohio just like an expert.
Gas vs. Charcoal
The Ageold argument over which grilling procedure will be "much better" entails multiple While no studies reveal that either is fitter, gas will burn cleaner. Charcoal grills emit more carbon dioxide, particulate matter and soot into the air, leading to greater pollution and high concentrations of groundlevel o-zone. In a preference perspective, on the flip side, a lot of men and women like the smokier, wealthier taste of food cooked in a skillet.
Obtain It alluring! Reaches the ideal temperature (also to kill any bacteria). Your barbecue ought to be 400 450°F to get top, 350400°F for medium-high, 300350°F for moderate along with 250300°F to get non heat. While searing does not "seal in" the juices (unlike popular belief ), it can create flavors that are improved through caramelization.
Additive-Free
Should You select charcoal grilling, then we still advocate additive-free bulge charcoal, then Which is simply charred timber. Traditional briquettes could comprise wood scraps and sawdust in addition to coal dust, gas nitrate, borax and additives such as jojoba or lighter fluid. In terms of lighter fluid, then we recommend quitting it altogether. Lighter fluid may release volatile organic chemicals (VOCs) to the atmosphere, make a embarrassing residue on food and also present a severe threat if used improperly.
Brush It Away
It is simpler to eliminate debris Once the grill is warm, therefore after preheating, utilize A longhandled cable grill brush onto your own grill stand to wash off charred debris away from prior meals. Scrape again just after usage.
Oil This up
On a grill that is clean, lean Meals can stick when put right on the Stand alone. Reduce adhering by oiling your sexy grill rack having a vegetable oil-soaked paper-towel: grip it together with tongs and rub it within the stand alone.
Safety-first
Food security is a high priority, therefore maintain these simple rules out of the USDA in Mind: prevent cross-contamination by using different cutting boards, utensils and platters for cooked and raw foods; Scrub foods while marinating; rather than baste using the marinating liquid. (Create additional marinade only for basting or boil your own marinating liquid first.)
Marinate Your Disposition
Marinating does greater than simply decorate food with taste; additionally, it suppresses the Formation of possibly carcinogenic HCAs (heterocyclic amines), that shape once grilling "muscle meats" such as poultry, red fish and meat.
The racket Evaluation
To Assess the warmth of a barbecue with no thermometer, put your receptive Your hands in two minutes, moderate in case it's necessary to go your hands in 5 minutes and Low in case you must move your hands at 10 minutes.
House exterior: windows cleaning
- Details
Washing windows is usually never fun, but it’s especially miserable when it’s cold outside. Regrettably, sometimes it’s essential to clean off the wintertime grime prior to the temperature rises. You’ll like to take some extra tips from cleaning services akron ohio during the winter season to ensure a successful and safe experience.
Assemble Your Tools
First, assemble the required tools to remove ice and snowfall from round the window. You may use a backyard spade to shovel snowfall off the sill, and warm (not very hot!) drinking water to melt any ice from the windows pain.
A ocean sponge is a wonderful choice for cleaning home windows. It holds a lot of cleaning answer and is porous plenty of to remove stubborn places on the glass. You’ll want a squeegee to clean away excess water furthermore.
If a ladder is needed by you to wash your outside windows, ensure that it’s secure and clear of ice. You need to ask someone to contain the ladder for you personally while you’re onto it, since the motion of washing windows makes it very unsteady.
Use Cold Water
Unfortunately, you’re likely to be very chilly once you wash your home windows this winter season and not just due to the temperatures. You should employ drinking water no warmer than lukewarm when cleaning home windows, since a severe and sudden temperature change can cause the glass to crack.
Make YOUR PERSONAL Solution
Don’t be worried about using store-bought windows cleaner for the outside windows. It shall be much faster, cheaper, and more efficient to make your personal cleaner. Simply fill up a bucket with an assortment of vinegar and water, and use your squeegee and sponge to create your window shine. Another great windows cleaning solution is a combination of water and rubbing alcoholic beverages or salt.
For Below-Freezing Weather
If possible, make an effort to wash your windows once the temperature is above freezing. However, we realize that uninviting your boss to supper because the windows are usually embarrassingly grimy will be much more hard than washing your home windows in below-freezing weather. If the elements is cold really, contemplate using antifreeze windshield washer liquid, as if you use in your vehicle. Your home windows will be clean plenty of to impress actually the pickiest of bosses.
Additional Tips
·Dress warmly in shoes with great grips to assist you stand safely on the latter, and put on a hat, and solid coat to remain warm.
·Put on waterproof rubber gloves to safeguard the hands from the chilly and the chemical substances. Tuck your coating sleeves in to the openings of the gloves which means that your coating doesn’t get wet.
·If you encounter difficult places, allow them soak for some moments while you focus on other areas of the window. Usually do not wait too lengthy to completely clean the soaking places, or the drinking water might freeze.